Depending on the data form that is currently open and on your user privileges, a variety of buttons are available on the Viewing pane toolbar, allowing you to perform a number of record functions.
Viewing Pane Toolbar
Save
Saves changes made to a record.
Edit
Switches a record into the edit mode. After clicking Edit, select the field you want to edit and make the necessary change.
Add
Creates a new record from scratch.
Delete
Removes an entire record from the database.
Lock
Bars a record from editing.
Unlock
Makes a record available for editing. (This button will only appear if the record is currently locked.)
Print
Prints, displays, or saves the PDF copy of a record in the report form. After clicking Print, specify which part of the report you would like to print. On the Report Visibility form, specify which record sections you would like included in the report and whether you want to download attachments, and then click OK. Finally, choose to either view a printable copy of the report (Open) or save a copy of the report to the location of your choice (Save).
Send
(Activity, Incident, and Case forms only)
Emails record details. After clicking Send, a new email window will open with general record details included in the body of the message. To format the message details in plain text rather than the default HTML table, click the Format icon. Specify the user or email address you would like the message to be delivered to, review the message details, and click Send. For further details on operating the Send Message editor, consult Appendix B: Text Editor Navigation at the end of this guide.
Merge
(Items, Persons, Organizations, and Vehicles forms only)
Merges partially duplicate records that correspond to a single physical referent that is an item, a person, an organization, or a vehicle. The function is represented by the Merge Items, Merge Persons, Merge Organizations, and Merge Vehicles buttons on the respective Viewing pane toolbars. For details on merging of records, see the Merge Records section.
Cancel
Switches the record from edit to read-only mode without saving changes.
Audit
To find out who created the record (Created By) and who last modified it (Last Modified), click the record’s top shield icon. To access similar information for one of the record’s entities (e.g., a specific Narrative or an Involved Person entry), select the appropriate entity in the grid and hover your mouse over the bottom shield icon. You may also click the icon to view the information in a pop-up window with added detail.
Some tabs consist of sub-tabs for further grouping of the data contained within. Whenever data in tabs is further subdivided into sub-tabs, Perspective enables editing of the sub-tabbed data (e.g., Involved Persons) with an additional sub-tab-specific toolbar. The quantity and the names of the functions included in this toolbar vary depending on the type of information contained in the sub-tab, although they may be similar to the ones performed by the buttons included in the Viewing pane toolbar.
To start editing details inside the record, you have to first put the record into the edit mode by clicking Edit on the Viewing pane toolbar. Then, to apply changes to a record’s entity (e.g., an Involved Person), select the entity in the grid and use the functions displayed in the sub-tabbed toolbar. The following table presents the common functions that are available in all data form types (the rest of the buttons that you may encounter in a sub-tabbed toolbar will be discussed in sections that describe the specific entities in detail).
Common Data Form Functions
Edit
Opens a pop-up form that contains the data of the entity. Make necessary changes to the fields (or plain text) in the form and click OK (or Accept & Return) to return to the main record.
Add New
Creates a new entity within a record (e.g., a new Involved Person entity).
Remove
Removes an entity within a record (e.g., an invalid Involved Person entity).
Go To
Opens an entity’s corresponding record, typically, in a different data form component. For example, going to the Involved Person entity involves opening the associated editable Person record in the Persons component of Perspective. In order to return the original data form (i.e., Incidents), select the required component from the Navigation pane. The views of both forms will be preserved.
Read/View
The Read and View options function similarly to Go To, with the only difference being that they open the entity in a read-only mode, where you may be able to zoom its contents, and/or print it, but not edit it. View allows an attachment to be saved to your computer, or opened and viewed in an appropriate application (i.e., an attached .doc file would open in Microsoft Word). You may scroll through the other entities of the same type (e.g., narratives, investigation summaries), without leaving the pop-up window, using the Previous and Next buttons.
Seal/Unseal
Removes/restores editing rights from/for an entity.
Note: Once you seal the entity, and then save and leave the corresponding record, it can never be unsealed. A new entity must be created in order to record amendments to the original one. Even if an entity is left unsealed, the Author is the only user authorized to edit the entity, unless special privileges have been granted to another user to do so. (If this button is not visible to you, your Administrator has not granted you the right to seal entities.)
History
To see the history of incidents in which a particular case-involved person, organization, vehicle, or item has been involved, select the entity of interest in the grid and click History. A new window will appear that displays a table of the entity’s involvement in the incidents stored in your organization’s Perspective database. For further details, see the View All Case’s Involvements section.
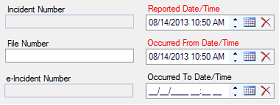
In a new data form, field with red titles are required to be completed (Figure 3.2.9). If you save the record before completing all required fields, the system will display a system message requesting completion of these fields. To see the classification and navigation of the available field types, see Appendix C: Data Field Types at the end of the guide.
Note: Your organization's data forms may contain additional fields, the so-called User Defined Fields. Usually, they appear under a separate like-named section. These fields will require entering additional pieces of information that may not be covered in this guide.