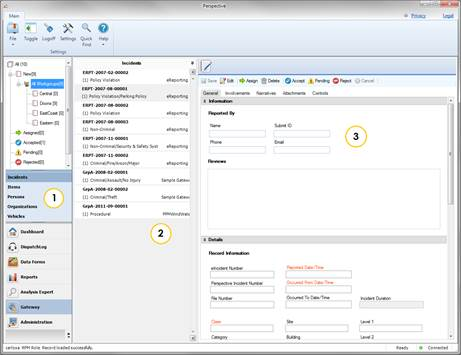
The Gateway interface is divided into three sections:
1. Navigation pane: Allows you to move between various types of Gateway electronic reports corresponding to the major Data Forms (i.e., Incidents, Items, Persons, Organizations, and Vehicles). To display folders containing reports for a particular Gateway report type (i.e., New, Assigned, Accepted, Pending, Rejected, and Deleted for Incidents; and New, Available, Added, and Deleted for Items, Persons, Organizations, and Vehicles), choose the required banner from the Navigation pane. Click on a folder in the Navigation pane to see all the reports contained within it listed in the Listing pane. If more than one workgroup’s electronic reports are contained in the folder, subfolders for the appropriate workgroups will be listed beneath the folder name in the Navigation pane. Expand the All Workgroups subfolder and select a workgroup to see only its particular reports in the Listing pane.
2. Listing pane: Provides a list of electronic reports selected in the Navigation pane for viewing. On the right side of every report entry the system records a corresponding source of a report’s import (e.g., e-Reporting). Once you select an e-Report in the Listing pane, the report’s contents will be displayed in the Viewing pane on the right. (For Incident e-Reports, the submitted XML data is saved under the Attachments tab.)
3. Viewing pane: Displays the contents of an e-Report selected in the Listing pane and provides options for saving, editing, assigning, deleting, accepting, rejecting, and closing individual reports, as well as transferring them into Available or Pending modes and viewing their XML versions. Every Incident report consists of a set of tabs (i.e., General, Involvements, Narratives, Attachments, Controls, and Audit History), while data for every Item, Person, Organization, and Vehicle report is provided on one simple form.
Note: If a folder in the Navigation pane contains more than 1000 e-Reports, you must first filter the report list before viewing it in the Listing pane. Once you click on the folder in the Navigation pane, a pop-up window will appear allowing you to filter the e-Incident list.
To display the top 1000 e-Reports (based on the reports’ identification numbers), click Start Search. Click OK to transfer the list to the Listing pane.
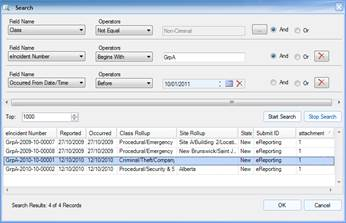
To search for a particular e-Report or a set of e-Reports, set specific filtering criteria:
1. In the Field Name lookup list, select the field that you want to set as the main criterion for narrowing your e-Report list.
2. Choose an Operator for the field (e.g., Equal, Not Equal, After, Begins With, Like, etc.).
3. Enter the compared criterion Value. If the Selector button  is available, click it to display a tree of Value options in a separate window. Note that you may choose any node of the tree as the defining criterion, making your comparison value as narrow hierarchically as you want.
4. If you want to include a second field as an additional filtering criterion, select the And or Or radio buttons and complete the Field Name, Operator and Value fields below. You may add as many filtering criteria as you want. To remove a field from your filtering criteria, click the Delete button  .
.
5. By default, only the top 1000 reports matching the criteria that you set will be displayed. To display more or less, adjust the number in the Top field (from 1 to 2000).
6. Click Start Search to generate a list of reports matching your filtering criteria. A count of the number of e-Reports in the list, as well as the total number of e-Reports matching your filtering criteria, will be displayed at the bottom of the window.
7. To make changes to the ongoing search, click Stop Search first, and then make the necessary changes to the filtering criteria.
8. When you are satisfied with the list of e-Reports displayed, click OK to transfer the list to the Listing pane in the Gateway.