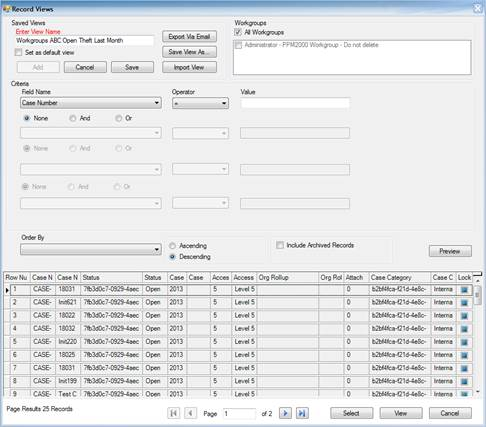
Create and Save a New Record View
1. In the Navigation pane, choose the record entity you intend to work with (e.g., Incidents).
2. In the view menu, click Quick View.
· The Record Views window will open. This is where you specify the parameters of your record view.
3. Click the Add button in the Saved Views section.
4. Type a name for your customized view in the active Enter View Name field.
5. Customize your desired view starting with the Workgroups section.
· By default, the All Workgroups box is checked to include records for all workgroups in your customized view. If you want to restrict your view to the records of a particular group, uncheck the All Workgroups box and proceed to select the desired workgroups.
6. Specify the Criteria for your view:
a. In the top Field Name lookup list, select the field that you want to set as the main criterion for narrowing your record view.
b. Choose an Operator for the field (e.g., equal (=), greater than (>), less than or equal to (<=), starts with, like).
c. Enter the compared criterion Value. If the Selector button  is available, click it to display a tree of Value options in a separate window. For example, if you are creating a Saved View of Incident records and your chosen Field Name is Access Level, you may select an Operator of equal (=) and a Value of Level 2, in order to restrict your view to only those records with an Access Level 2.
Note: You may choose any node of the tree as the defining criterion, making your comparison value as narrow hierarchically as you want. For example, when specifying a Value for the Class Rollup, you may select any node in the Class Rollup hierarchy, ranging from the broadest category values, like Criminal, to the narrowest sub-class type values, like Company Property/Over $1000.
If you choose to select a date field in the Field Name lookup list, you have the option of using a floating date (e.g., Yesterday), rather than a fixed date to narrow your record view by. The Floating Date checkbox is only visible once a date field has been selected. For example, if you want your view to display incident activity that occurred during a floating period of a previous month, choose Occurred From Date/Time as Field Name, equal (=) as the Operator, and then check the Floating Date box and select Previous 30 Days as your Value.
d. If you want to include an additional field in your record view criteria, select the And or Or radio buttons and complete the Field Name, Operator, and Value fields below. You may include up to four fields in your record view criteria.
To specify a static date range, specify two temporal criteria (e.g., one for the greater than (>), and one for the less than or equal to (<=) Operator), using the And logic between them to combine the criteria into a set date range.
7. Choose a display order for your record view by selecting a field from the Order By lookup list (e.g., order records by Incident Number, Access Level, Status).
8. Select either the Ascending or Descending radio button to further define the record order.
· The ascending radio button lists the records according to the chosen Order By field in alphabetical order, or from lowest number to highest. The descending radio button lists the records according to the selected Order By field in reverse alphabetical order, or from highest number to lowest.
9. Include archived records in your record view by checking Include Archived Records.
10. Click the Preview button to generate a list of records meeting your set criteria in the order specified.
· The number of records found will be provided under Page Results.
11. To quickly view a particular record in read-only mode, select the record in the Preview list and click View.
· A separate window will open with the record details displayed.
12. If you want to save the record view for future use, complete the Saved Views section. Otherwise, proceed to the next step. Perspective provides three saving options for your newly created view:
· To save your record view for future use in Perspective, click Save. Your newly-created record view will now be available under the Saved Views menu.
· If you want to set this customized view as your default view (the record view that will automatically load each time you enter this data form), click the Set as default view box, and click Save again.
· To save your record view as an XML or TXT file, click Save View As and select the location for the export. The record will be assigned an automatically generated number.
13. To return to the Data Forms window and transfer your record view to the Listing pane, click the Select button.
14. Click on a record in the Listing pane to display it in the Viewing pane.
· If you clicked on a particular record in the Record Views window prior to clicking Select, the record will be highlighted in the Listing pane and will already be opened in the Viewing pane.