Attach a File to a Record
1. Select the Attachments tab.
2. Select the Files sub-tab.
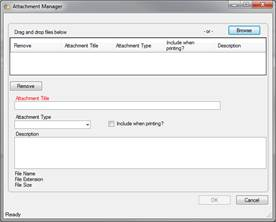
3. Click the applicable Add link. A pop-up window will open.
4. Add attachments by either dragging and dropping or clicking Browse.
5. For each attachment, do the following:
a. The Attachment Title field will automatically populate with the name of the attached file. If necessary, modify the name.
b. From the Attachment Type lookup list, select the appropriate designator for the attachment (e.g., Document, Picture, Video, Voice Recording).
c. Give an overview of the attachment in the Description text box.
d. For image files (e.g., .bmp, .gif, .jpg, .png), check the Include when Printing? box to have a copy of the image included with every print-out of the record.
e. Click Remove to remove any unwanted attachments.
6. Once you are finished working with attachments, click OK.
7. To preview an attachment, ensure the attachment is highlighted in the grid and click View.
8. Once the attachment is loaded, click Open. The attachment file will open in a separate window.
9. Close the window to return to the record.
View Attachments
There are two ways to view attachments in Perspective.
The first way to view an attachment is the following:
1. Select the Attachments tab.
2. Select the Files sub-tab.
3. Click the file name you want to view from the list of attached files.
4. Click the View link.
5. Click Open.
The second way to view an attachment is the following:
1. Select the Attachments tab.
2. Select the Pictures sub-tab. Thumbnails of attached files will be visible.
3. Left-click the thumbnail for a full screen view of the attachment.
4. To close the full screen view of the attachment, click the X icon in the top right corner.
a. Right-click the thumbnail to view the title and description of the attachment. Right-click to go back to the thumbnail.

